BizTalk Server is able to communicate with the outside world, leveraging the Azure Service Bus Relay, Queues and/or Topics/Subscriptions. The latter is indirect one-way messaging (brokered) through listening to a specific subscription, in a topic or service bus queue. Through the relay, you can have direct two-way messaging. This capability can help in scenarios where you do not want to expose your ERP system like SAP or other directly to the cloud connected system. You might also have invested in a BizTalk solution and like to have an easy access to the cloud yet do not want to change the systems. The other benefit of using the relay is that you do not have to move your BizTalk installation into another zone like the DMZ to be closer to the outside world.
Other means of access to BizTalk can be indirect through the Logic App adapter (new with BizTalk Server 2016) or directly by exposing a BizTalk endpoint (WCF-BasicHttp, WsHttp or WebHttp) in IIS, accessible through reverse proxy. The latter is also possible using the BizTalk WCF Service Publishing Wizard that will extend the reach of the service to the Service Bus.
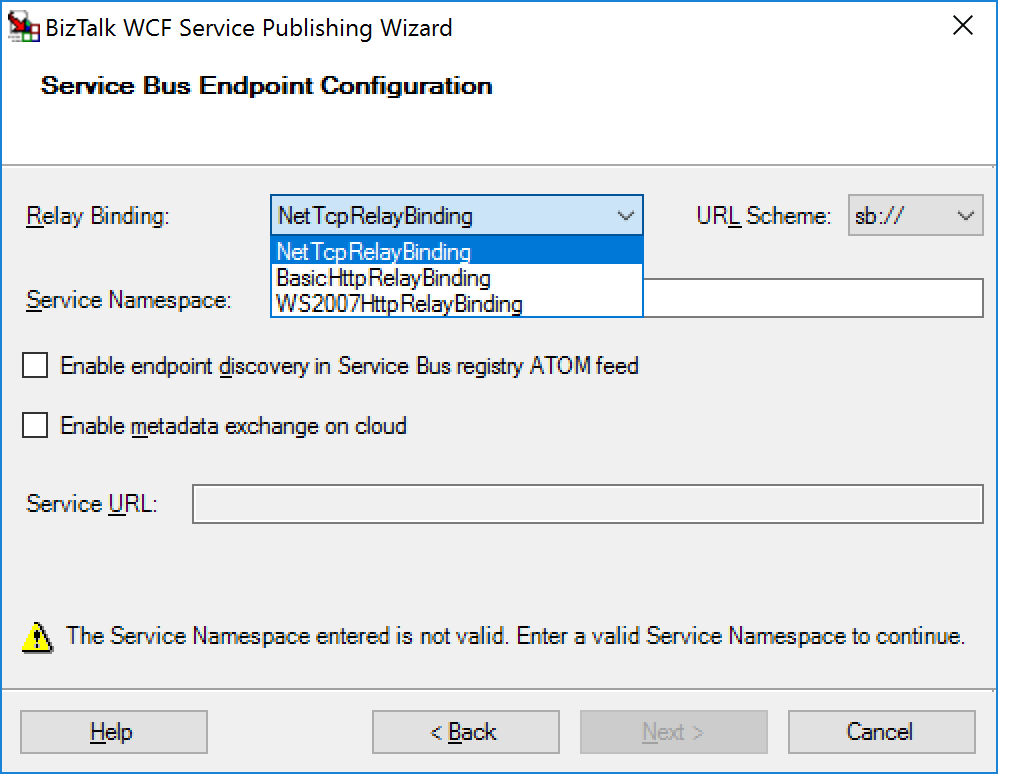
In this blog post, we’ll be discussing on securing a BizTalk endpoint that uses the BasicHttpRelay or NetTcpRelay i.e. a BizTalk endpoint configured with these WCF Bindings. Extending an endpoint using WCF Publishing Wizard doesn’t add extra capability, yet more complexity as the endpoint will be exposed internally through the chosen binding, however, to the Service Bus one of the relay bindings has to be selected (see picture below).
To be able to have an endpoint exposed to Azure Service Bus, you will need a namespace in your subscription. To setup a Service Bus Namespace is straightforward — in the Azure Market Place, select Service Bus and click Create. Specify a name i.e. that’s the namespace, choose a suitable price plan and specify the Resource Group and Location (regional data center).
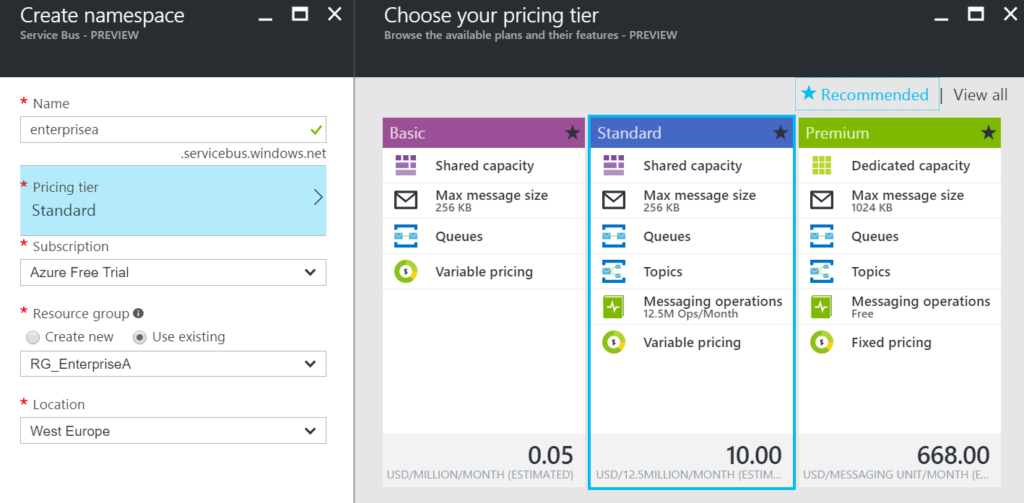
In the picture above, you can clearly see what each price plan offers in terms of capacity, features and message size. This Azure service and others are very transparent in their costs and capability by vividly showing the options in pricing tiers.
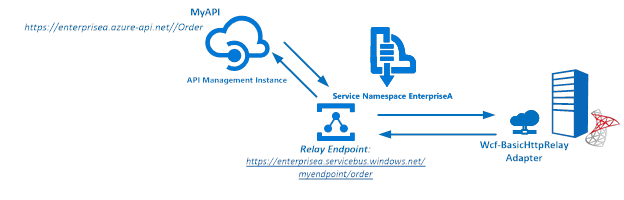
Our scenario to explain how to secure a relay configured BizTalk endpoint will be as follows:
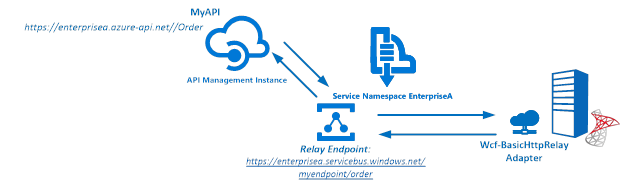
The Service Bus Namespace credentials are abstracted away in the API management and not known to the MyAPI user. The MyAPI user will have to provide an API Key to be able to call the operation Order. The MyAPI can be further secured by applying OAuth 2.0 or OpenID, which we will not discuss in this blog.
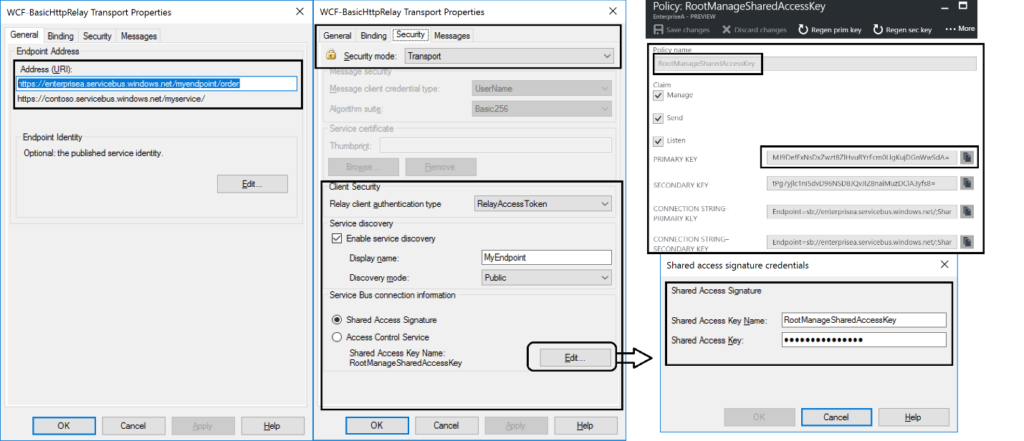
BizTalk Server started providing support to the Azure Service Bus with SB-messaging, WCF-BasicHttpRelay and NetTcpRelay adapters. The relay, as mentioned earlier, supports two-way messaging, and that will be the adapter we will use to build our scenario. The configuration of the relay in BizTalk is straight forward. You create a Receive Port, add a Receive Location, select the appropriate binding i.e. BasicHttpRelay or NetTcpRelay and configure.
The key aspects of the configuration are the address, which is the namespace of your service name to be placed in the standard DNS. servicebus.windows.net followed by the name of your endpoint at the end. And security, where we specify the security mode, client security (authentication type), and connection information i.e. SAS key, which can be obtained through Shared Access Policies tied to our Service Bus namespace.
Once we configured our adapter and enabled the ReceiveLocation, the endpoint will be registered in Service Bus Namespace.
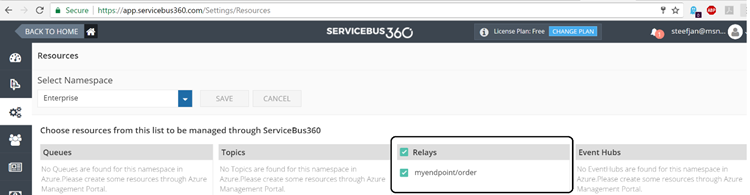
The endpoint is available, however, not visible or discoverable through the Azure Portal. To see if the endpoint is up, we use Turbo360 (Formerly known as Serverless360) or we could use the Service Bus Explorer.
API Management is an Azure Service, which can be provisioned through the Azure Portal. The service provides an API gateway i.e. you can publish API’s to external and internal consumers. You can also provide a gateway to backend services hosted in your data center like a BizTalk endpoint (hosted in a Receive Location, or actually the Host Instance). The features API Management provides are:
In this blog post, I will demonstrate some of the features mentioned above in relation to securing BizTalk endpoints.
To create an API Management Service, you can select API Management in the Azure Portal and click Create. Specify a name i.e. that’s the name of your API Management instance, choose a suitable pricing tier, specify the Resource Group, Organization Name, Administrator Email and Location (regional data center).
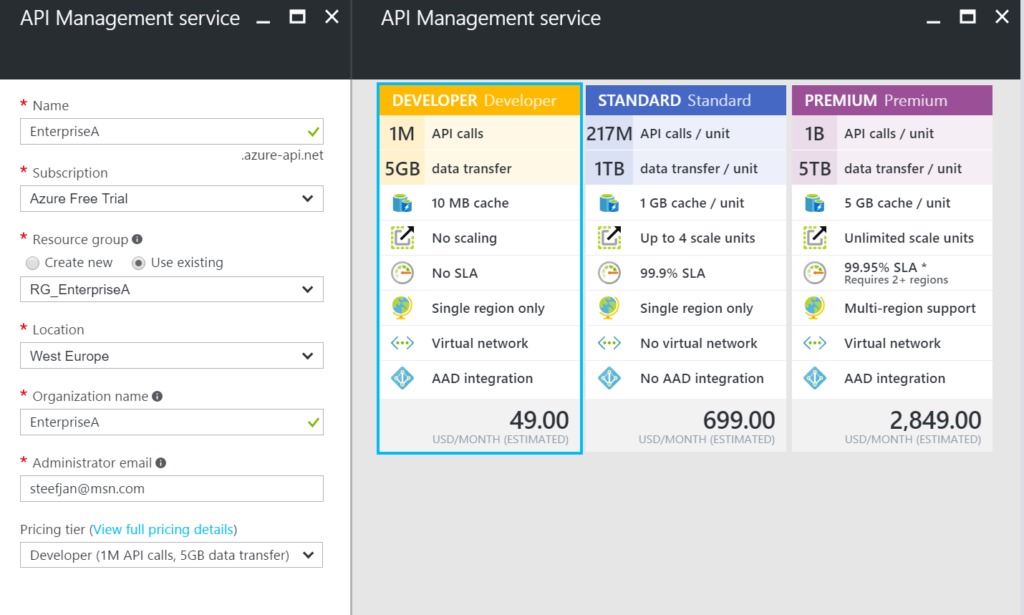
Again, in the picture above, you can clearly see what each price plan offers in terms of capacity, features and scale. The provision of your API Management service i.e. instance can take some time (30 minutes or more).
Our first step is to open up the Publisher Portal by clicking Publisher Portal in our API Management Service. In the Publisher Portal, we can click Add API and specify a Web API name, the Service URL of our relay endpoint, which we like to secure. We place our API in Starter Product, which is an existing default product what limits us in 5 calls/minute up to a maximum of 100 calls/week. For demo purposes, this is sufficient. More on products, read Microsoft docs How to create and publish a product in Azure API Management.
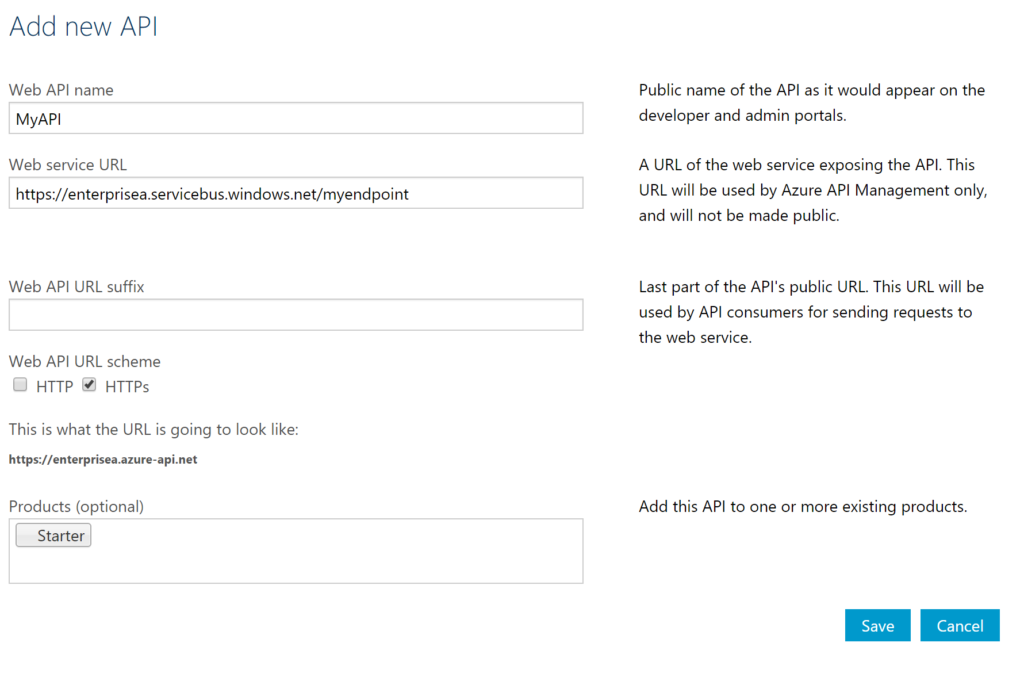
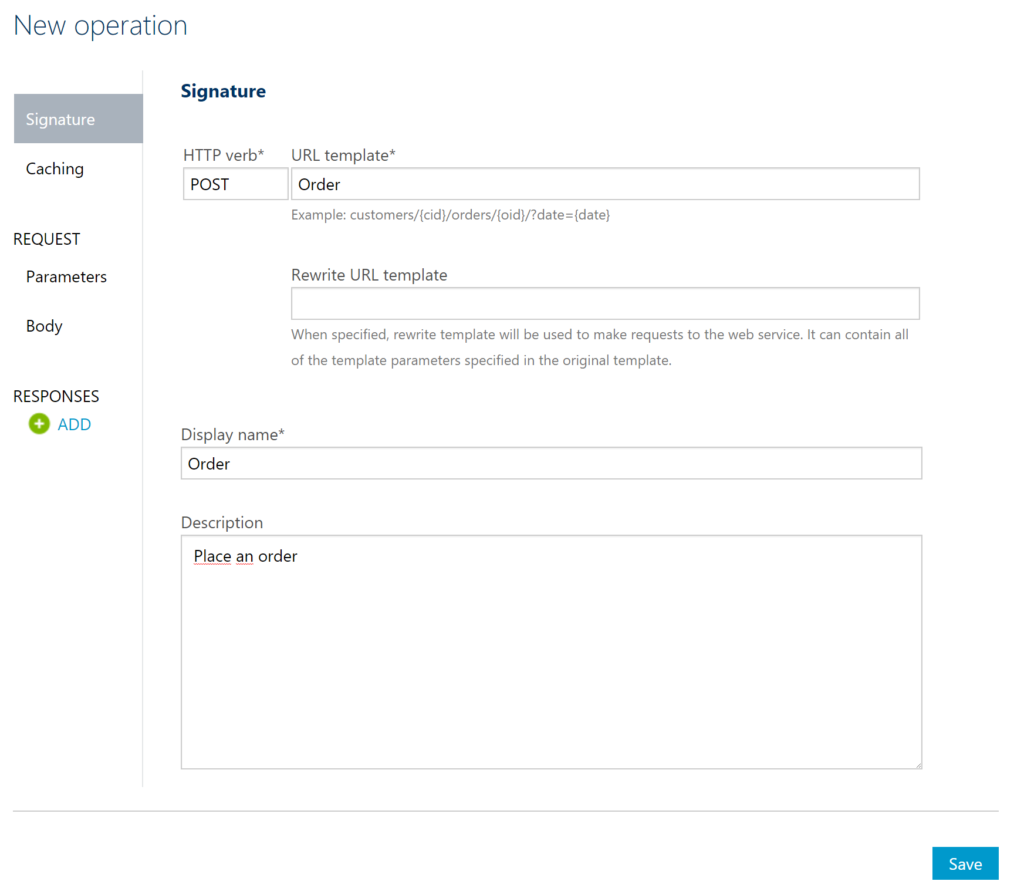
The second step is adding an operation to the just defined API, which will be a REST type of operation i.e. POST on our endpoint i.e. the relay endpoint that is hosted by BizTalk. The endpoint for this operation will be the following https://enterprisea.servicebus.windows.net/myendpoint/order.
The API and its operation have been defined and the final step will be setting a policy on our operation. Policies in API Management are where a lot of the magic happens, like converting JSON to XML or vice versa, applying CORS, or set HTTP headers. The latter is what we need to set a pre-generated SAS token (using Shared Access Signatures, enter the token in a CDATA tag). We could ask the client of our API to set these headers, however we then devalue the strength of API management and enforce the client to provide the SAS-key. In that case the client needs to know the Service Namespace credentials, which is not what we want. With API Management, we can enforce other authentication strategies or just simply let the client use our API and provide only an API-Key. We will discuss this in testing the endpoint through API Management.
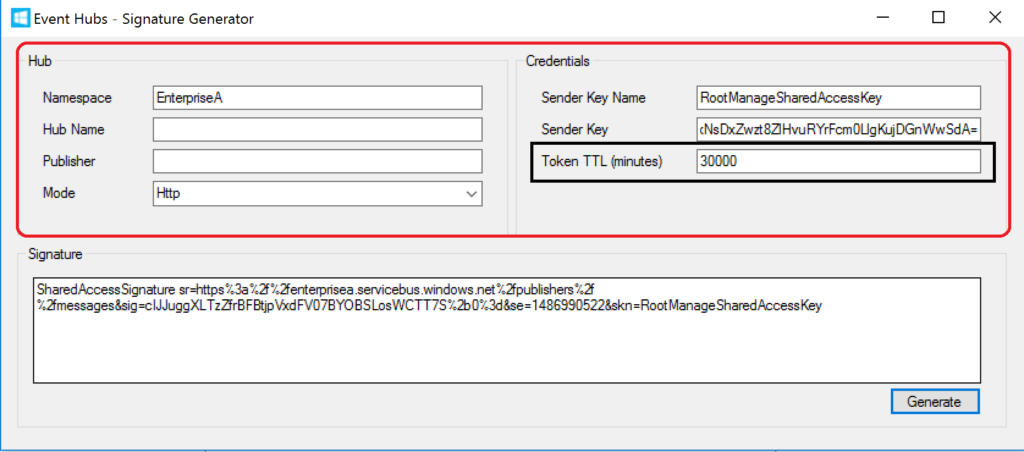
In the policy, we will set the Authorization header for accessing our relay endpoint and we will need a SAS-token. Now the SAS-Key needs to be generated by us and put into the set-header name policy as shown below.
<policies>
	<inbound>
		<set-header name="Authorization" exists-action="skip">
			<value><![CDATA[SharedAccessSignature sr=https%3a%2f%2fenterprisea.servicebus.windows.net&sig=E26706kmlcrFlkdP%2bgcFqalfKRAxzO2Ht%2flz8BhuGaqQ%3d&se=1484788588&skn=RootManageSharedAccessKey]]></value>
			<!-- for multiple headers with the same name add additional value elements -->
		</set-header>
		<base />
	</inbound>
	<backend>
		<base />
	</backend>
	<outbound>
		<base />
	</outbound>
	<on-error>
		<base />
	</on-error>
</policies>
The SAS-token will have a validity of a certain period of days or months, which at some point need to be refreshed in the policy. Fortunately, you can use a tool from Sandro Dimattia to obtain the token for a certain amount of time i.e. the Time To Live (TTL, see also Protecting your Azure Event Hub using Azure API Managment). We will further discuss this later on the considerations concerning the refreshing of the token.
Our API is now ready to be tested. It is already published and available, because we placed our API in the Starter Product, which is published and protected by default. Note that a custom product is not published by default.
Testing of an API can easily be done in the Developer Portal of our API Management instance. In the Azure Portal, we click Developer Portal where we click on the API menu item (top bar) and select our API. The API has only one operation, which is Order. We will try it out and add a header to indicate the content type for the payload, and our request body (which the format our BizTalk endpoint is expecting).
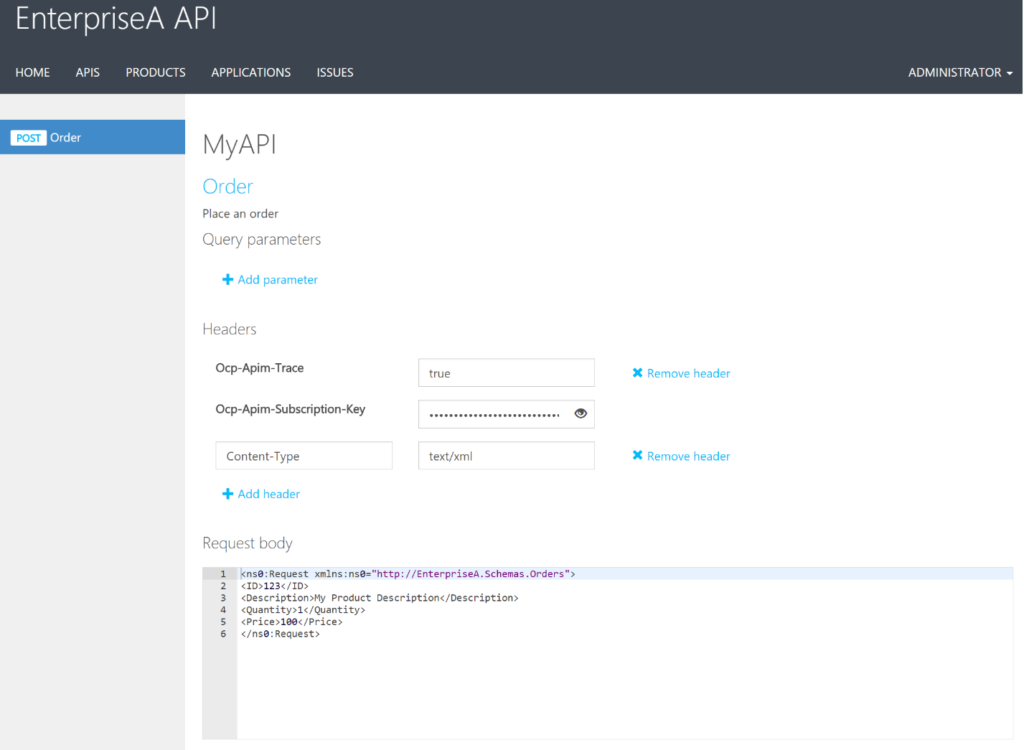
When we hit Send we will be sending the following over the wire:
POST https://enterprisea.azure-api.net//Order HTTP/1.1
Host: enterprisea.azure-api.net
Ocp-Apim-Trace: true
Ocp-Apim-Subscription-Key: ••••••••••••••••••••••••••••••••
Content-Type: text/xml

<ns0:Request xmlns:ns0="http://EnterpriseA.Schemas.Orders">
<ID>123</ID>
<Description>My Product Description</Description>
<Quantity>1</Quantity>
<Price>100</Price>
</ns0:Request>
We receive the following response:
<strong>Response status</strong>
202 Accepted
<strong>Response latency</strong>
6033 ms
<strong>Response content</strong>
Transfer-Encoding: chunked
Strict-Transport-Security: max-age=31536000
Ocp-Apim-Trace-Location: https://apimgmtstigjqylbzcvt5mdi.blob.core.windows.net/apiinspectorcontainer/LghnyTlQR3qEhFUmXwPlsQ2-24?sv=2015-07-08&sr=b&sig=ewuBua9VTrXtwrrOmMeCdm5uA54uBtqB9FO2CjSVOl8%3D&se=2017-01-19T17%3A21%3A14Z&sp=r&traceId=1d50bac0dc28414a8cc1d46281e03e41
Date: Wed, 18 Jan 2017 17:21:20 GMT
Content-Type: application/xml; charset=utf-8

<ns0:Response xmlns:ns0="http://EnterpriseA.Schemas.Orders">
	<ID>123</ID>
	<Status>Ok</Status>
	<Error>
		<Code>0</Code>
		<Description>No Error</Description>
	</Error>
</ns0:Response>
We can also click on Trace to investigate deeper what happens behind the scenes i.e. beyond the API endpoint https://enterprisea.azure-api.net//Order. When we hit inbound we can inspect the call to the relay endpoint.
{ "configuration":
{ "api":
{ "from": "/",
"to":
{ "scheme": "https",
"host": "enterprisea.servicebus.windows.net",
"port": 443,
"path": "/myendpoint",
"queryString": "",
"query": {},
"isDefaultPort": true } },
"operation":
{ "method": "POST", "uriTemplate": "/Order" },
"user": { "id": "1",
"groups": [ "Administrators", "Developers" ] },
"product": { "id": "587f536c0c2a0e0060060001"
}
}
 }
As you can see this is interesting detail information. We see the host i.e. endpoint of our relay with port 443 i.e. HTTPS type of port, path (/myendpoint) and uriTemplate (/Order).
We can drill down further by click Backend in Trace and observe the details there. We see the complete URL (address) where the payload will be posted.
{
"message": "Request is being forwarded to the backend service.",
"request":
{ "method": "POST",
"url": "https://enterprisea.servicebus.windows.net/myendpoint/Order",
"headers":
[ { "name": "Ocp-Apim-Subscription-Key",
"value": "fd8f172f22bf405283f7796ed90c8eb1" },
{ "name": "Content-Length",
"value": "184" },
{ "name": "Content-Type",
"value": "text/xml" },
{ "name": "Authorization",
"value": "SharedAccessSignature sr=https%3a%2f%2fenterprisea.servicebus.windows.net&amp;amp;amp;amp;amp;sig=E26806kmlcrFydP%2bgcFqalfKRAxzO2Ht%2flz8BhuGaqQ%3d&amp;amp;amp;amp;amp;se=1484788588&amp;amp;amp;amp;amp;skn=RootManageSharedAccessKey" }
,
{ "name": "X-Forwarded-For",
"value": "13.94.139.231"
}
]
}
}
We also can observer the API Key i.e. Ocp-Apim-Subcription-Key, Content-Type, the header with the SAS-Token, and an IP address, which is the Public Virtual IP (VIP) address of our APIM Instance where the request was initiated.
Note that if other developers want to test it, they will be required to subscribe to the Product and use a subscription key to access the APIs included in it. We can access it, since we created the Azure API Management and therefore we are administrator.
BizTalk endpoints which are configured with the relay extend their reach or boundaries to Azure and such provide means of access to the outside world in a new way. Through the relay, two-way direct messaging can be facilitated with external parties. To further secure the endpoints, by not sharing the service bus credentials, we used API Management, which brings in a few aspects you have to bear in mind.
The first aspect is the availability of the BizTalk endpoints. They can extend as shown in this blog post, however they depend on the host instance under which the receive location runs. If the host is stopped, then the endpoint will become unavailable. You can mitigate this risk by having two instances of the BizTalk host and a Receive Location with the same address i.e. endpoint registered in the Azure Service Bus. And then there is the availability of the Service Bus and API Management, both are managed by Microsoft and fall under a SLA.
The second aspect is the quality of service, which has moved from BizTalk side to API Management. This means that you can implement security, rate limiting, throttling, and other service quality aspects at the API Management level by configuration using policies. This is a huge time saver, since on the BizTalk level you, for instance will have to build a custom behavior to support OAuth 2.0.
The third aspect I like to discuss, is the contract of the message you sent to the API. The actual contract is abstracted away as only the endpoint is visible as an operation in the API. Therefore, you still need to agree on the contract and format i.e. XML or JSON with your consumers. We have shown XML messages here, yet BizTalk supports JSON natively using the appropriate pipeline components.
The final aspect will be TTL of the token. As you have seen in this blog post you can create a SAS-token that has a validity based on how you set it using a tool. You do have to keep in mind when the token has almost expired you refresh the token. Moreover, you will need to have a certain SLA in place to ensure the service endpoint does not become unavailable.
This blog post has provided an overview on how to secure BizTalk endpoints exposed through WCF-Relay bindings, in particular we chose WCF-BasicHttpRelay. The NetTcp variant would not have been any different, other than on the protocol level. A BizTalk endpoint can be secured leveraging the relay and API Management, i.e. we can apply some quality of service aspects through API Management on our BizTalk hosted endpoint. BizTalk itself can host the actual service itself, which can be any type of service.
Using API Management, you can abstract the relay endpoint away from the consumers (clients), whitelist IP’s, cache response, monitor health, have support for OAuth 2.0, and many other aspects that are hard to accomplish with BizTalk itself when it comes to exposing endpoints to Azure. The other benefit is that you do not have to burden infrastructure guys to move BizTalk to another zone, or open up extra firewall ports, setup reverse proxies, and so on (see also a talk by Kent Weare API Management Part 1 – An Introduction to Azure API Management).
If you like to further explore the technology that has been showcased in this blog I, would suggest to explore the following resources: